These ideas run from an LED strip tucked behind chair rail trim to a full wall of painted boards that eats a weekend and most of a gallon of paint.
What picks one over another is whether the room needs to feel bigger, calmer, or simply finished, since vertical boards do all three depending on where you stop them.
The nickel gap, that eighth-inch reveal between boards, is what makes shiplap read as shiplap and not siding; without it you have a flat panel and none of the shadow lines that sell the look.
1. Vertical Shiplap Wall
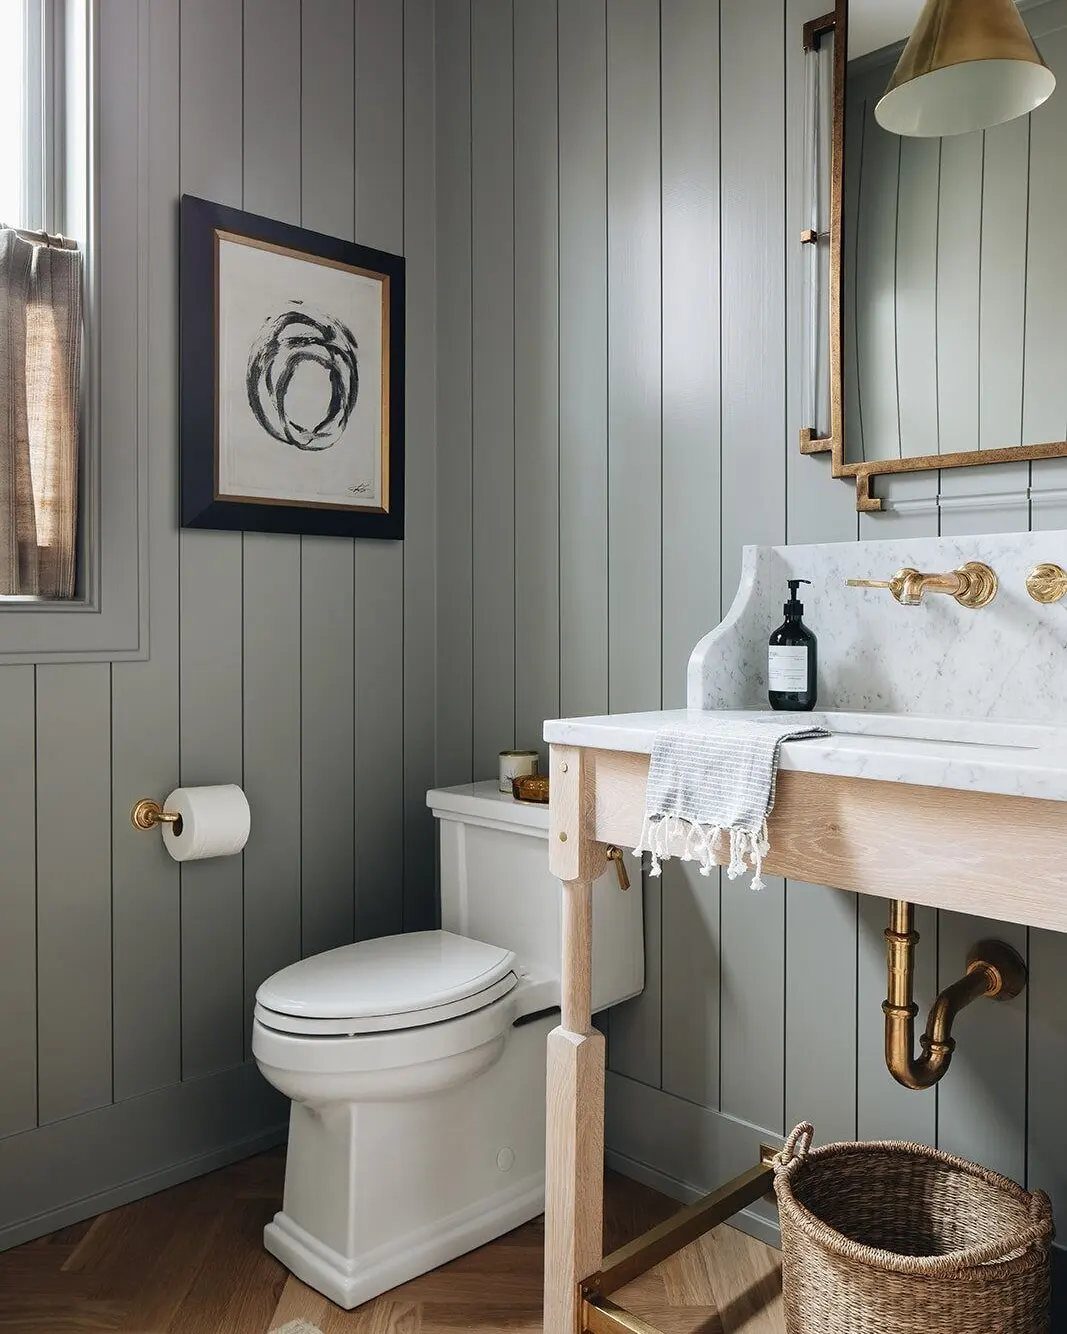
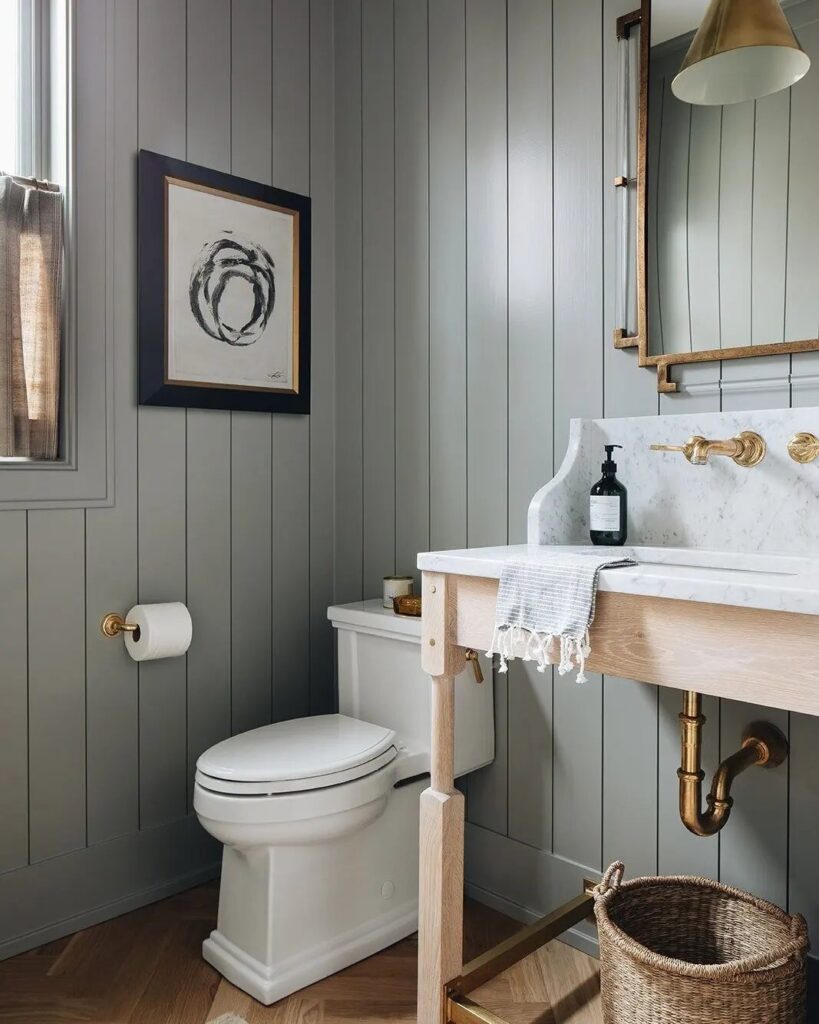
Grey boards running floor to ceiling turn a powder room into something that feels built a century ago and still looks right. The vertical lines draw the eye up, which matters in small rooms where every inch of height counts.
I like this for a first project because a powder room is small enough that you can finish it in a weekend and the tight space forgives a few uneven joints.
You can mess up a cut, fix it, and still finish in a weekend. Solid wood or MDF both work; MDF costs less and takes paint evenly, though it swells if water sits on it.
Gold fixtures warm up grey boards and keep the room from feeling cold. Without them the room goes cold fast.
2. Where to Use
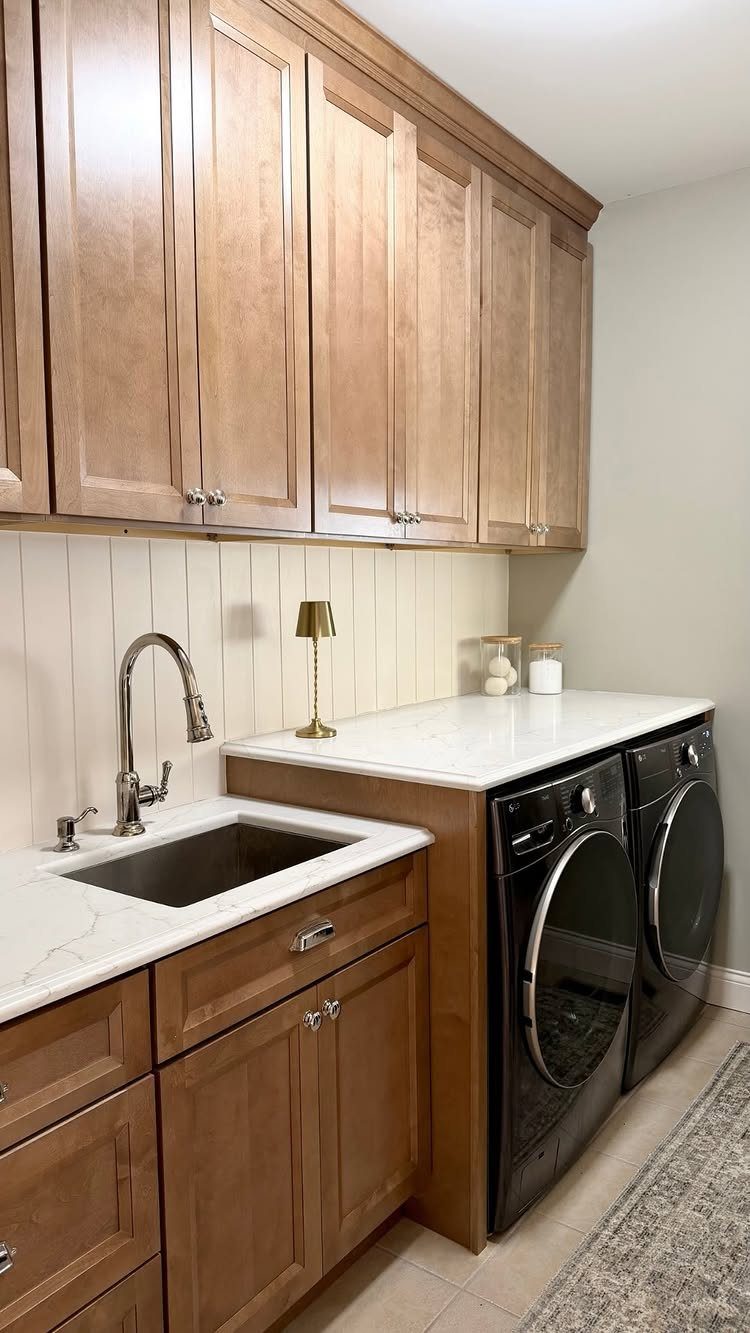
A laundry room backsplash is where I’d start if I were unsure about committing to a full wall. The machines give you a natural stopping point, so you only cover what you see.
Ceiling height changes the math. In a two-story vaulted room, vertical boards look like toothpicks and the material cost multiplies.
Smaller spaces with standard ceilings let you buy boards that run full height and skip nearly all end-to-end joints, which is where amateur work shows.
Dust settles in the gaps between boards. A microfiber cloth run top to bottom every couple of weeks keeps it from building into something that needs scrubbing.
3. Paint the Vertical Shiplap
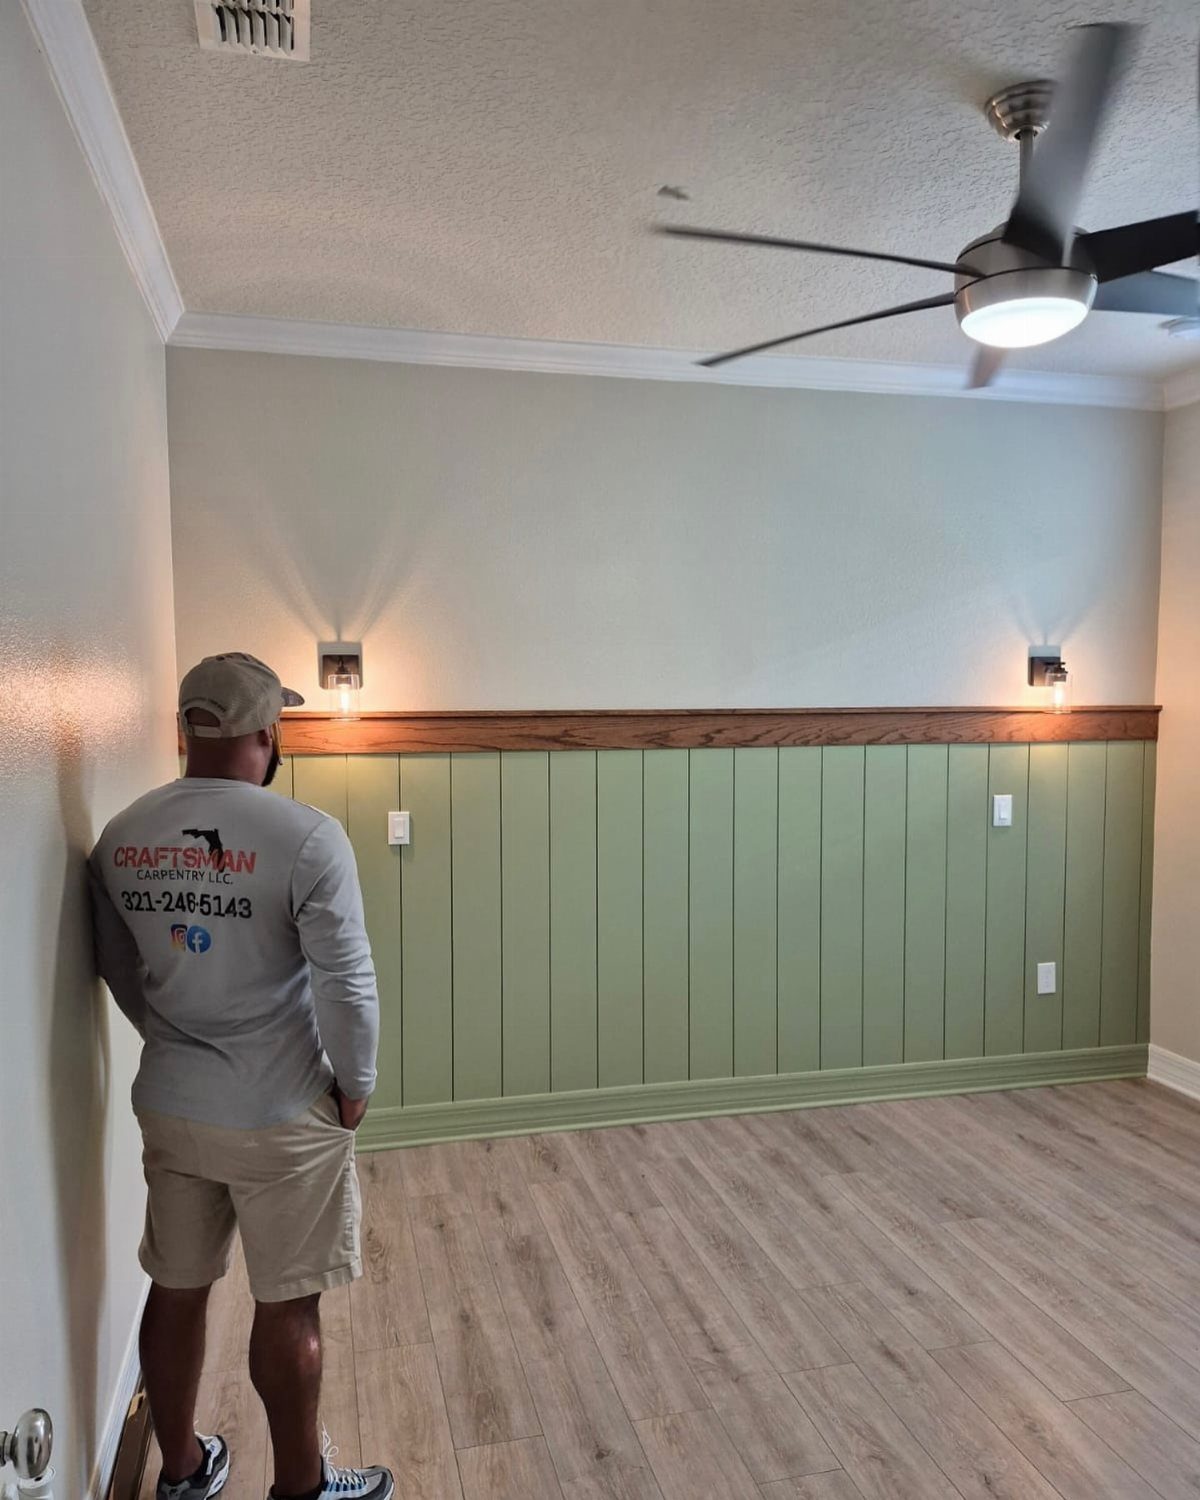
Taping off shiplap is half the battle. The gaps between boards are narrow, so paint bleeds through if your tape line isn’t tight.
I cut in by hand at the baseboard gap rather than fighting tape in a quarter-inch space.
A foam roller on the flat boards, a brush for the edges and gaps. The brush work takes longer than the rolling.
Plan for two coats minimum; the tongues and grooves drink the first coat and the color goes patchy until the second.
Sage green reads neutral in most light and pairs with wood tones without fighting them. I’d test a patch at the room’s darkest hour before buying enough for the whole wall.
4. Vertical Shiplap
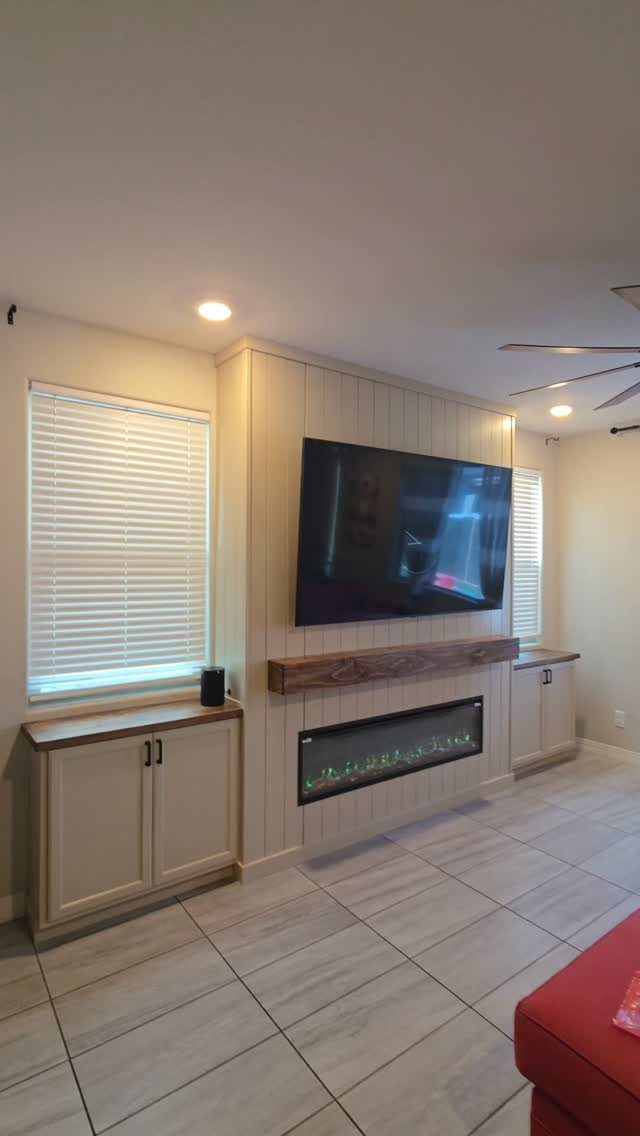
A fireplace bump-out is built for this treatment. The vertical boards emphasize the height while the mantel breaks the line and gives your eye somewhere to rest.
Without that horizontal element, a full wall of vertical boards can feel like a fence.
The TV mounted above the fireplace is a practical reality for most of us. The white shiplap behind it disappears enough that the screen reads as the feature, not the wall.
Built-ins flanking the firebox turn the whole thing into an intentional composition rather than a TV hung over a hole.
This suits someone who wants one statement wall, not a whole house of it.
5. White, Black, and Earthy Tones
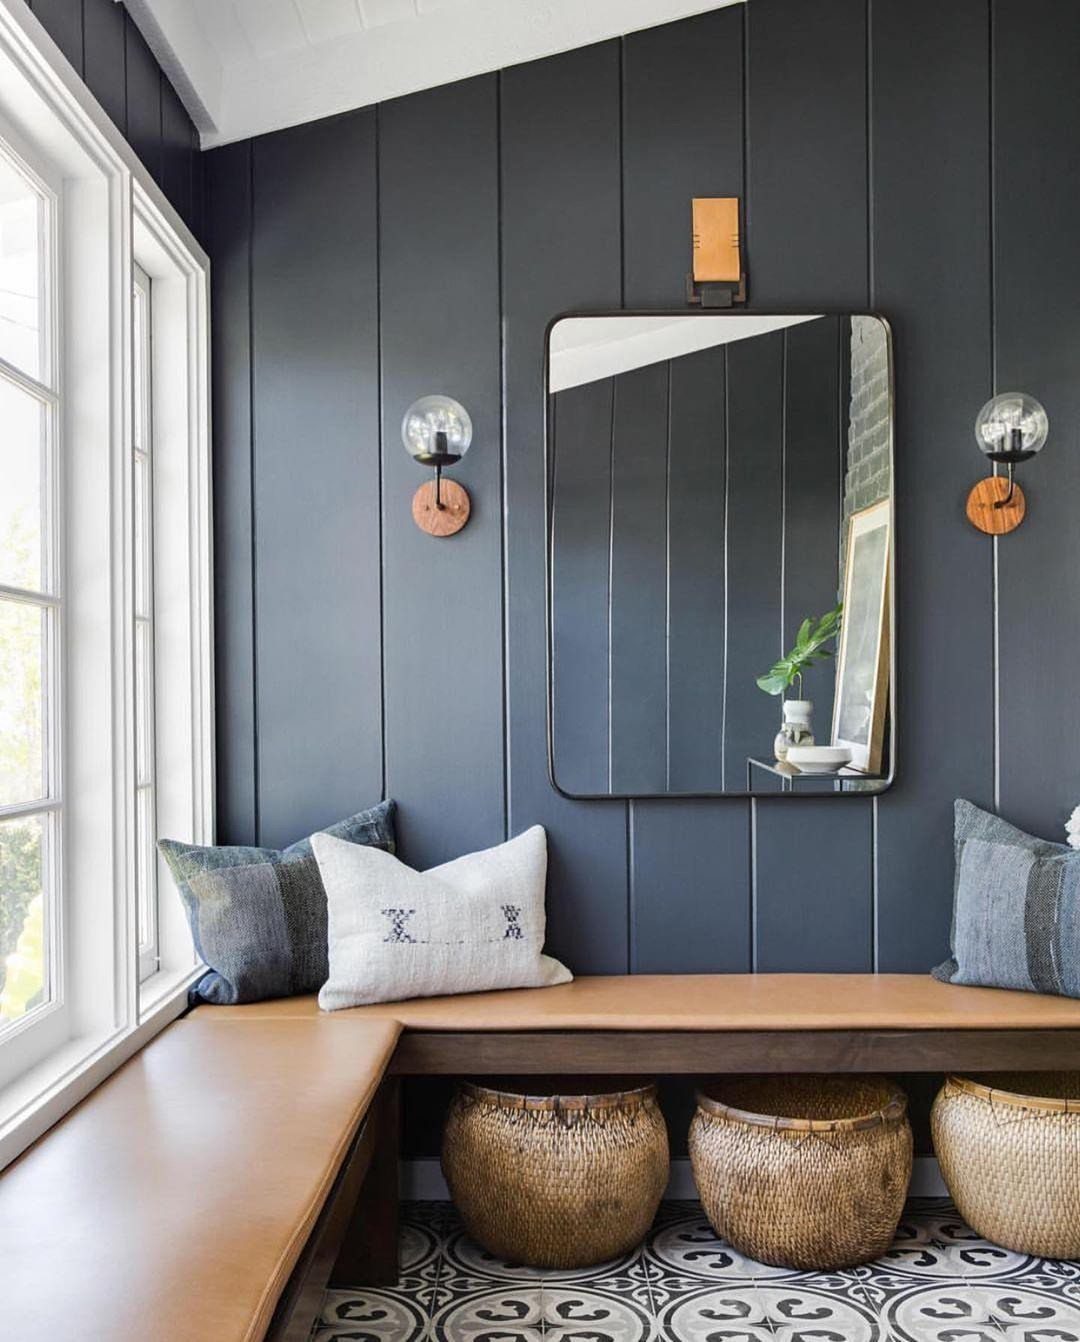
Charcoal reads as black with the lights on, softer in daylight. You need something warm against dark boards or the room turns into a cave; a bench and baskets do the work without adding color.
White and cream brighten spaces that don’t get much sun. I’ve seen cream go yellow in rooms with south-facing windows, so test your sample at noon.
Earth tones, muted greens, dusty blues, they do the same job as white but with less glare. A tone-on-tone room, where the shiplap is only a shade or two from the trim, feels calm in a way high contrast doesn’t.
I’d pick this for a bedroom or any room where you want to stop thinking about the walls and just live in it.
6. Backlit Vertical Shiplap Wainscoting
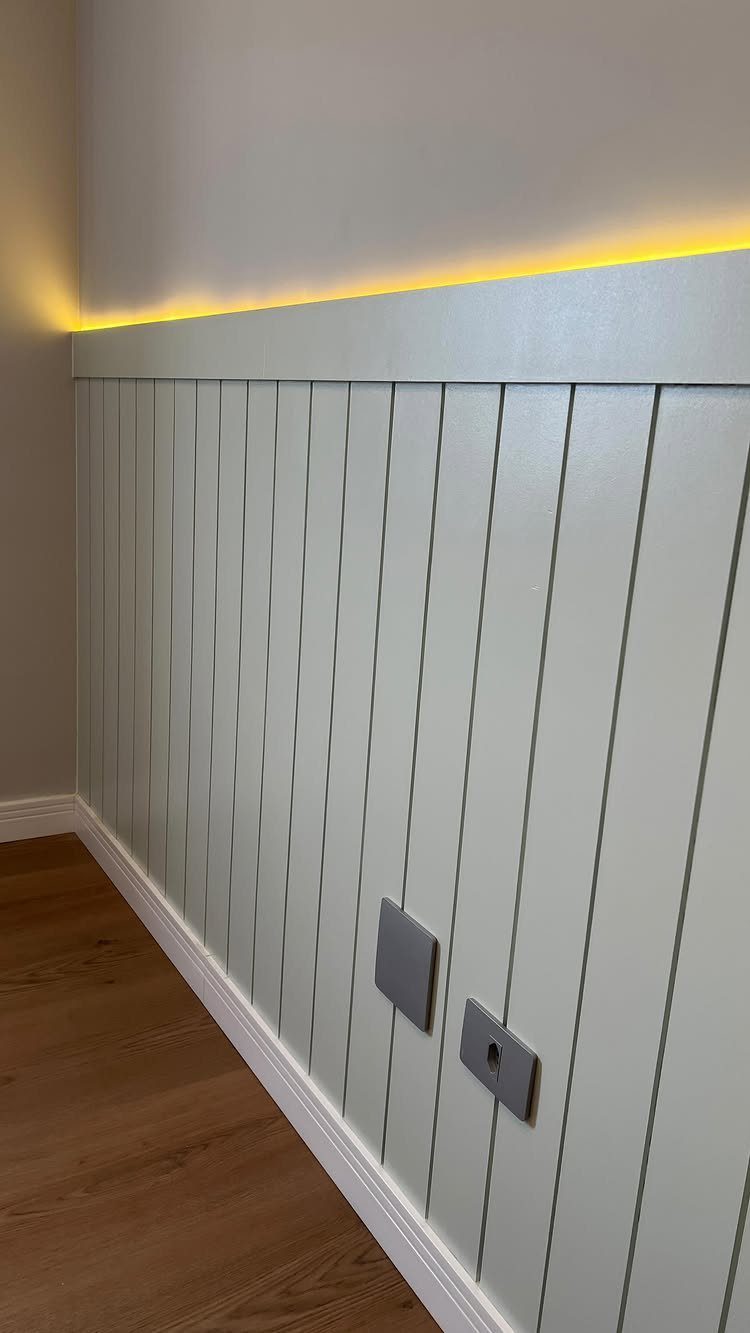
The LED strip hides in the gap where the top rail meets the wall, so the light washes down the boards without ever showing its source. Warm white, not daylight, or the grey-green goes sickly.
You need a receptacle nearby or a battery pack you’ll hate changing. Hardwiring is the move if you’re already opening the wall.
The strip itself is cheap; the transformer and dimmer add cost but let you tune the glow to the time of day.
Wainscoting stops at chair rail height, so the light stays below eye level even when you’re standing. This matters in a hallway or room you pass through, where a full-wall backlight would glare at you straight on.
Best for someone who wants atmosphere without a fixture hanging in the way.
7. Shiplap Behind Built-in Desk
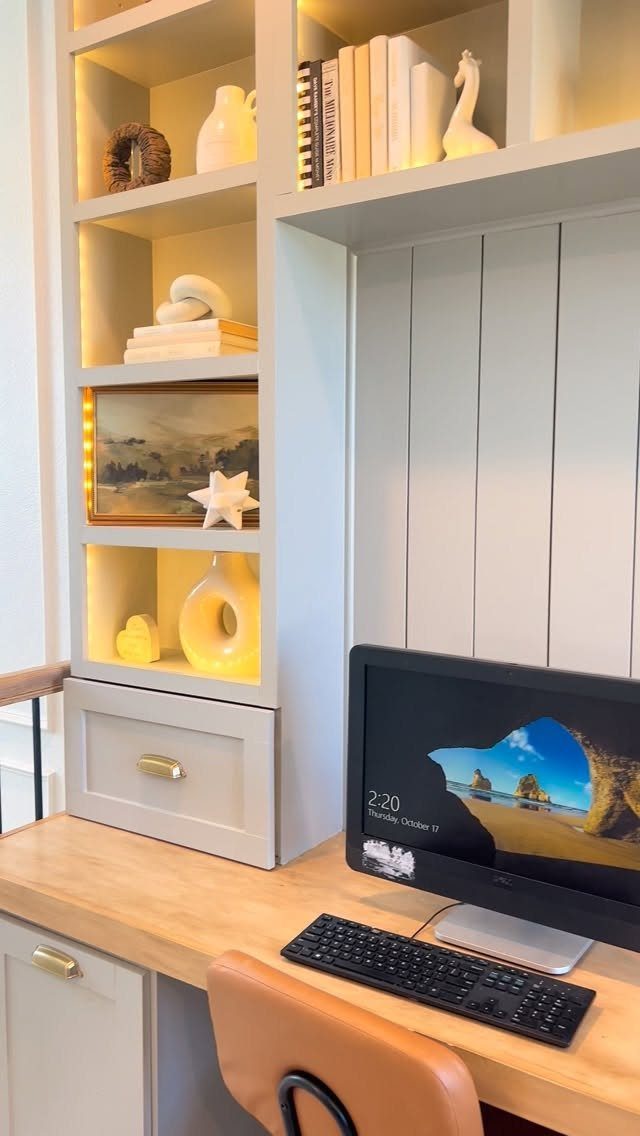
A built-in desk backed with vertical shiplap reads like a real office, not a spare corner. The boards run floor to ceiling behind the desktop and shelves, which keeps the wall from looking like an afterthought.
I would use 1×6 boards with a nickel gap, painted the same color as the cabinet faces so the whole unit feels like one piece.
The shiplap needs to go in before the countertop and shelves, since trying to slide boards behind an installed desktop is miserable. A darker paint on the wall behind the monitor also cuts glare better than white.
This works best when the desk spans most of the wall; on a narrow desk it can feel like paneling swallowed the room.
8. Shiplap Fireplace Accent Wall
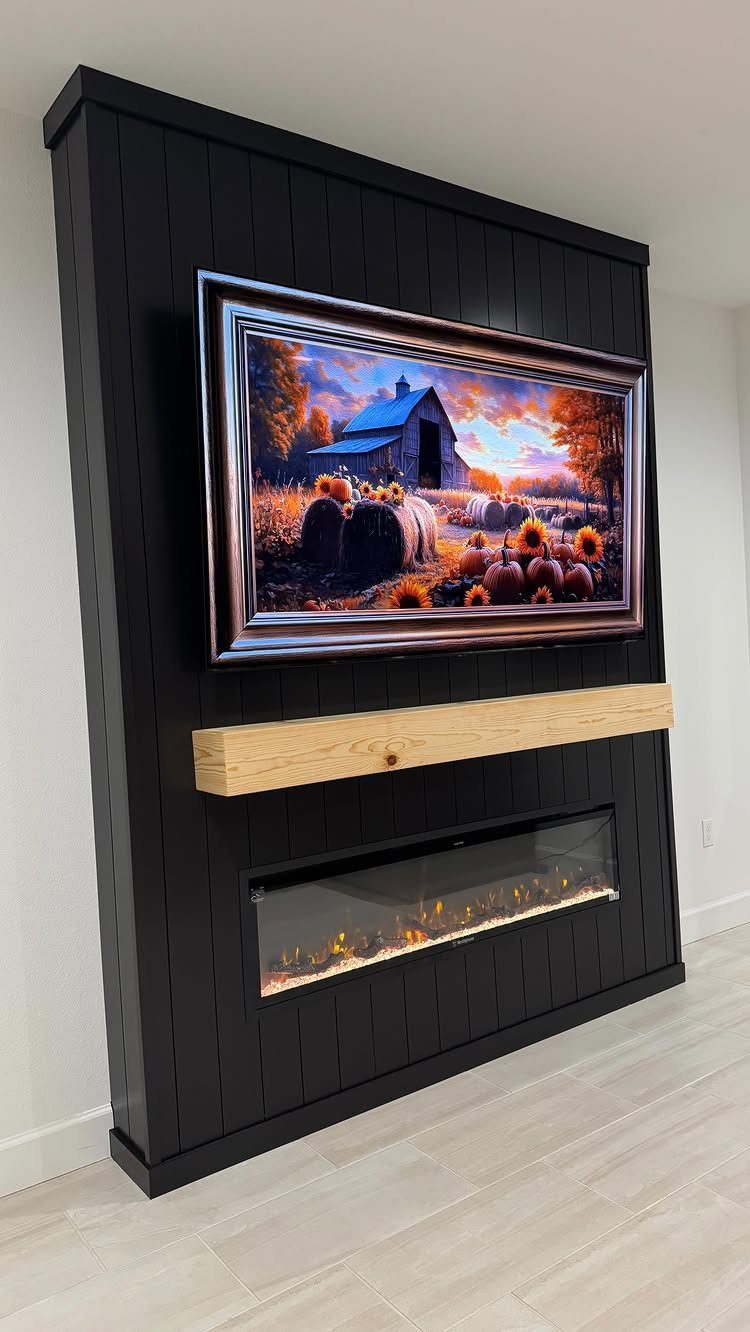
Black vertical shiplap turns a fireplace into something you notice before the furniture. The boards draw the eye up the full height of the wall, and the matte finish keeps the black from reading like a mirror.
Electric fireplaces need no clearance for venting, which means the shiplap can run right to the unit’s edges.
A wood mantel in a light, natural finish breaks up the dark and gives you a place to rest a frame or a candle without worrying about heat.
I would mount the mantel with a French cleat so the wall stays clean.
Black shows dust and wood grain inconsistencies more than white or gray. A satin or eggshell paint helps hide both.
9. Floating Shelves on Shiplap
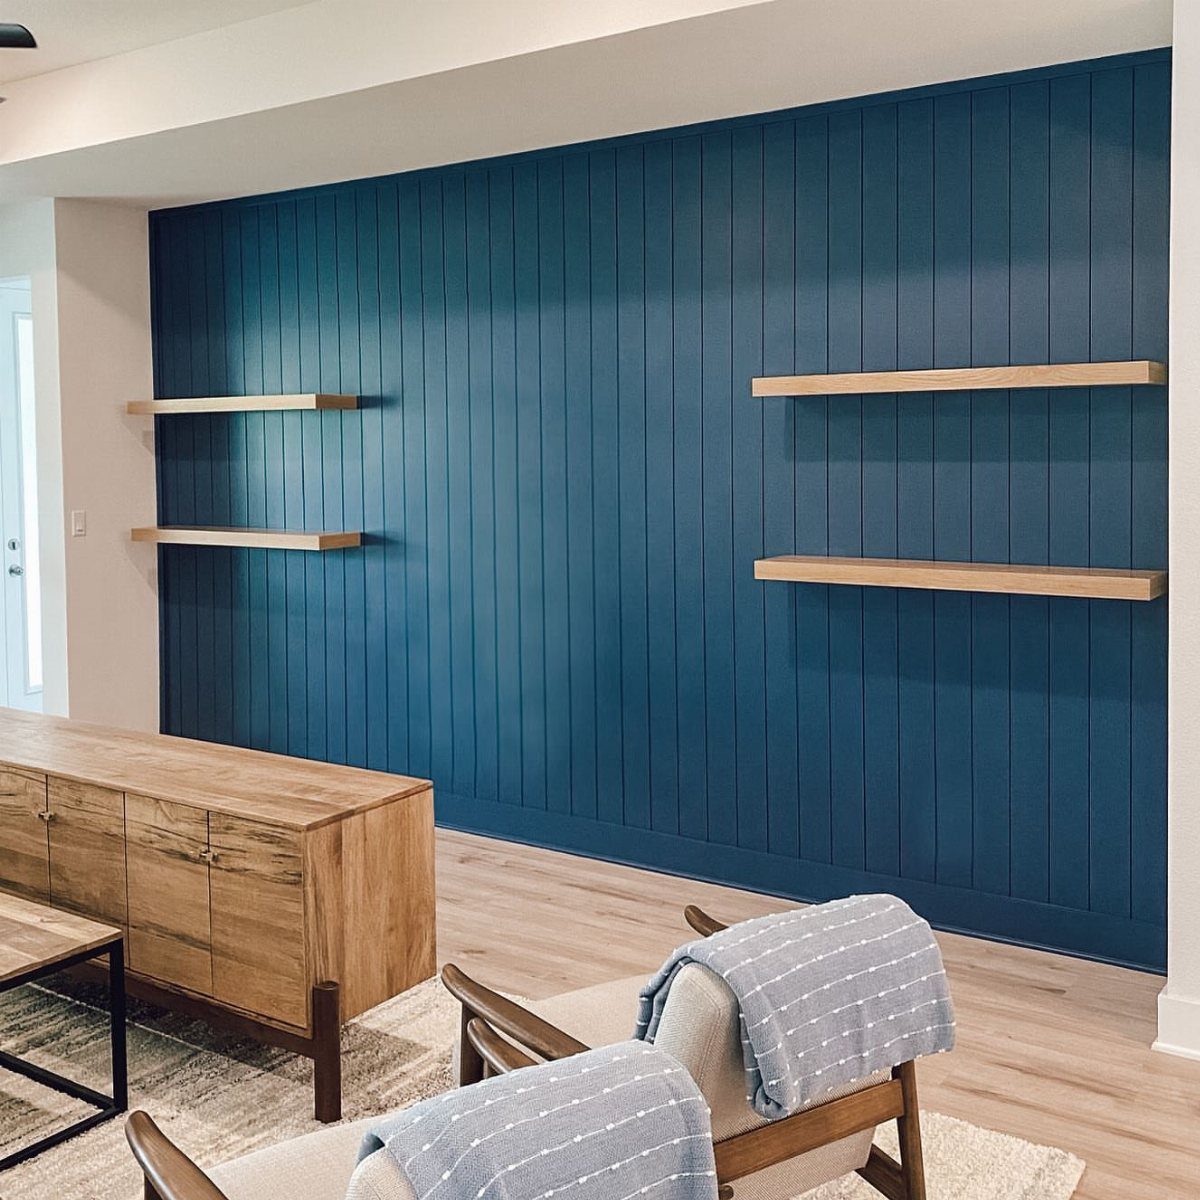
Dark teal boards make the shelves read as objects rather than clutter. The vertical lines already pull the eye up; adding floating shelves in a pale, warm wood gives the wall actual depth and a place to set things down.
I’d space shelves far enough apart vertically to fit most books and vases without crowding.
Finding studs or using proper toggle anchors matters, since shiplap gaps do not line up with standard stud spacing and the last thing you want is a shelf that tilts.
A level line marked across the boards before drilling saves the headache of measuring twice at each bracket.
This suits renters who can patch a few holes later better than those who need to keep walls pristine.
10. Mudroom Vertical Shiplap Wall
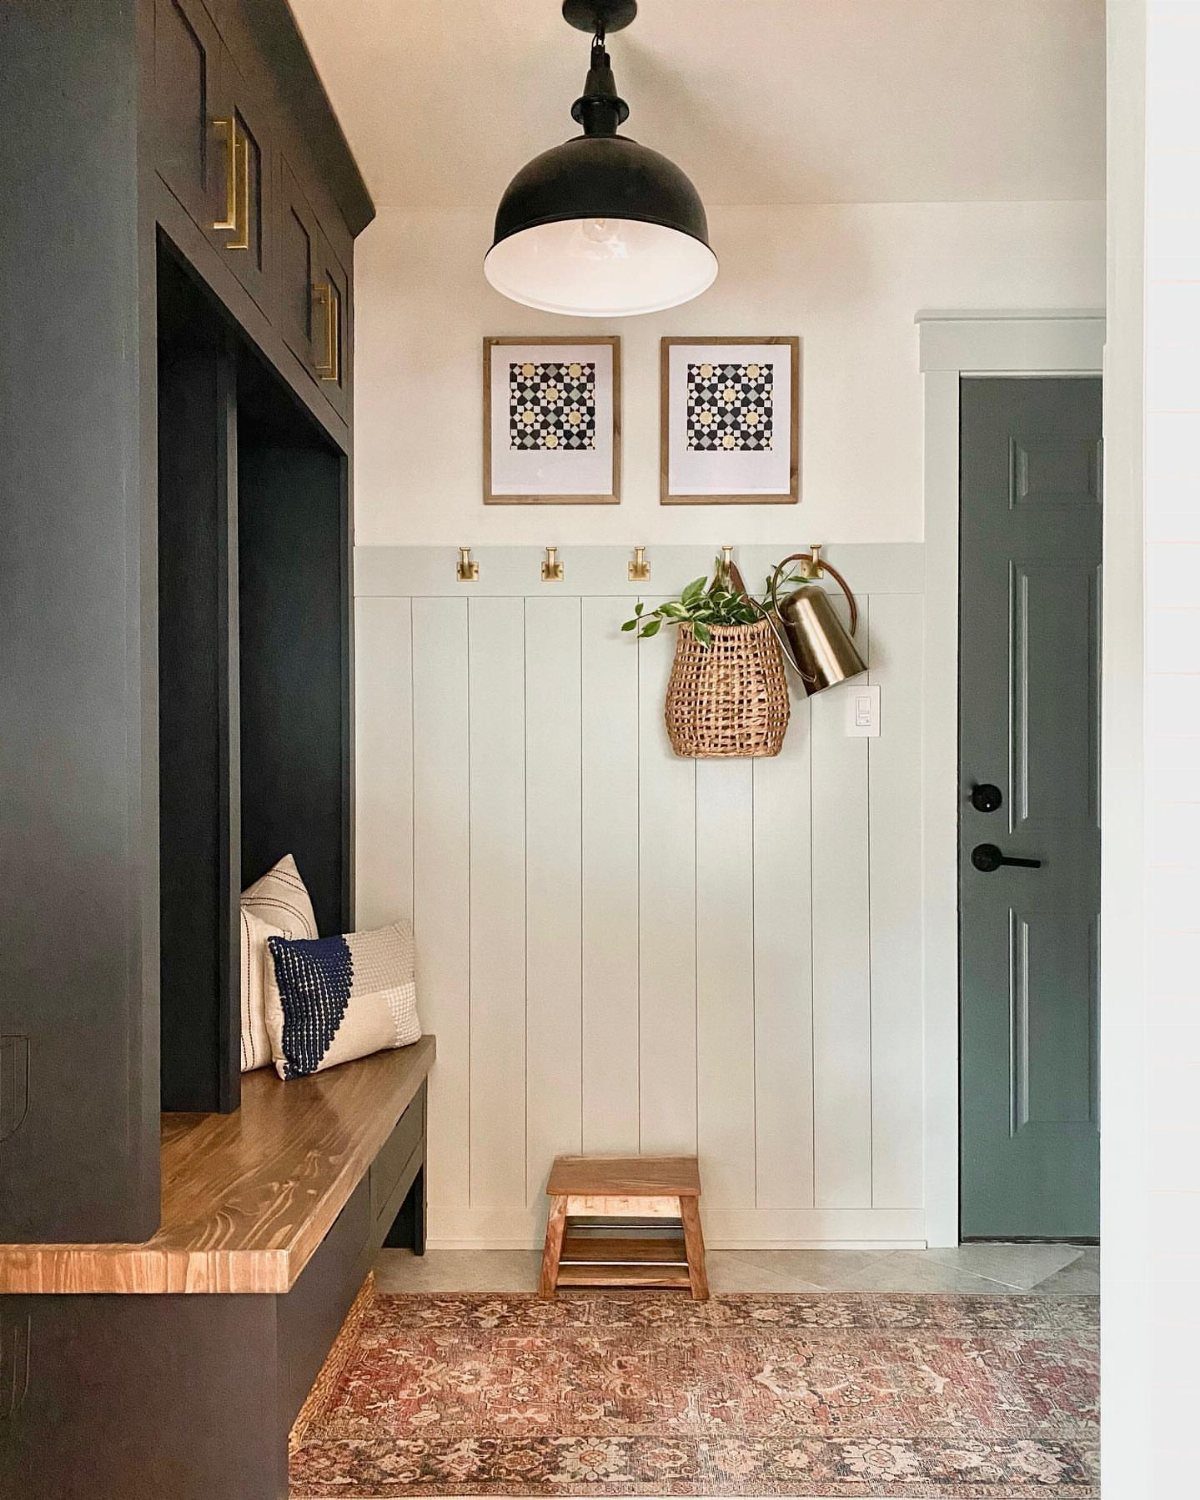
Mudrooms take a beating, and vertical shiplap holds up better than drywall against kicked boots and wet coats.
The boards run from floor to bench height or all the way up, with hooks set directly into the studs behind for strength.
A built-in bench with a hinged lid gives you hidden storage for mittens and off-season gear.
I would leave the boards painted white or a very pale gray; mudrooms rarely get great light, and dark walls make the space feel like a closet. The cushion should be a removable cover you can wash, not fixed upholstery.
Gold hooks warm up the white, though satin nickel hides water spots longer. This one is worth the weekend if your entry is currently a pile of shoes with no place to sit.
11. Vertical Shiplap Wainscoting
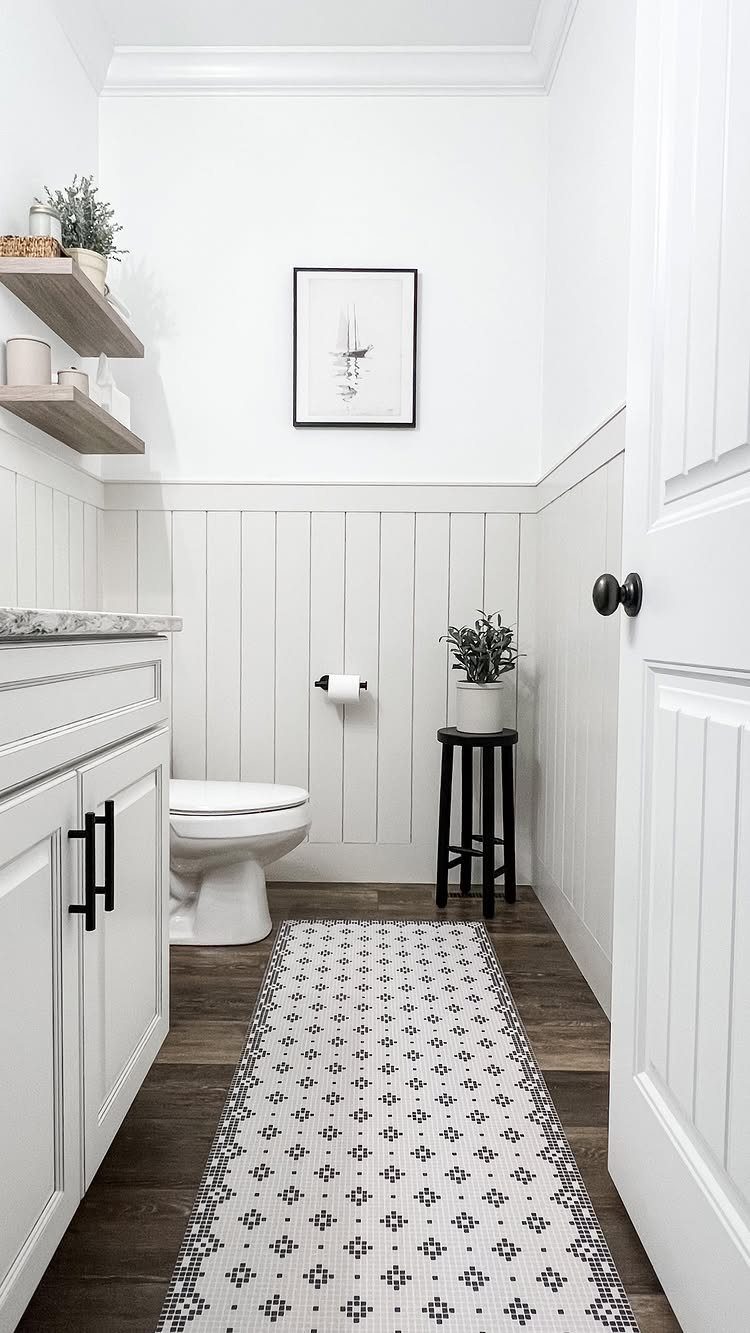
Half-wall wainscoting in a bathroom keeps the shiplap clear of splash zones and gives the eye something to rest on below the mirror line.
The vertical boards run from baseboard to roughly waist height, capped with a simple ledge or chair rail.
In a narrow room the lines make the walls feel taller, which matters when there is no window.
Paint the upper wall and lower shiplap the same white and the room reads larger; contrast the two and you emphasize the architecture.
I would carry the same paint onto the ceiling if it is low, since a different color up there chops the height.
A small bath like this needs no special boards. Standard 1×4 pine, primed and painted, costs half what "bathroom paneling" runs at specialty stores.
12. Shiplap TV Accent Wall
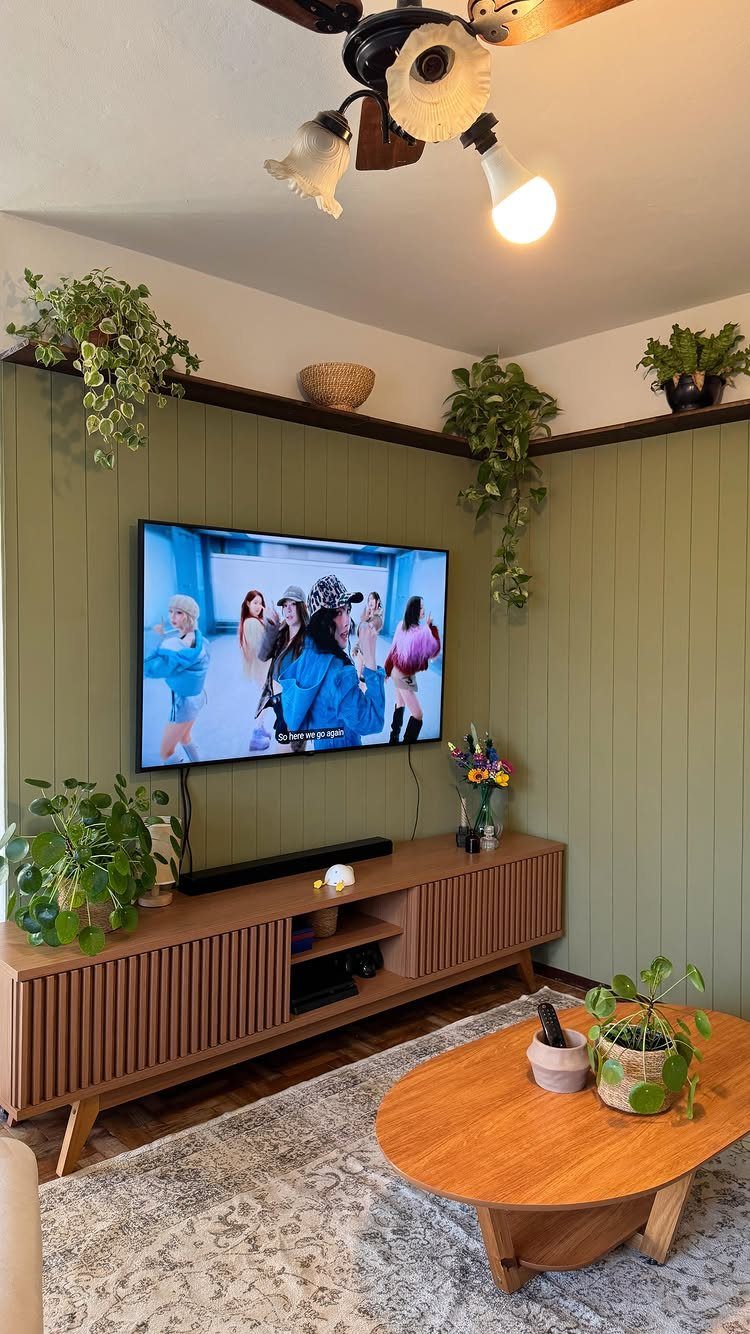
Sage green behind a television is calm enough to stare at but not so neutral the wall disappears.
The vertical boards give the mounted set a frame it does not otherwise have, and the color reads differently in morning and evening light.
I would run the shiplap the full wall width rather than boxing in just the TV area, which can look like a repair job.
The media console should sit low enough below the screen bottom for breathing room, and the boards need to go up before you mount anything.
A swing-arm mount is easier to install on shiplap than a fixed one, since finding two studs through the gaps takes patience.
This suits someone who wants the TV present but not celebrated; the green does the decorating so you need less around it.
Installation Tips
Measure twice before any cuts; a board cut short costs another trip back to the store and whatever they are charging for lumber that week.
I mark stud locations on the ceiling and floor, then snap a chalk line so every board has solid backing at the edges.
Construction adhesive like Liquid Nails holds boards tight and removes the need for face-nailing, which leaves holes to fill. The trade is that removing the boards later destroys the drywall beneath, so this is for permanent installs only.
For something you might change out in 2 years, brad nails through the tongues let you take it down clean.
A 4-foot level is your best friend; the eye catches a board running off true faster than you’d think. Check every third board and adjust before the adhesive skins over.
Maintenance
The same cloth works dry; wetting it leaves streaks on satin or eggshell finishes.
Paint touch-ups show less on lower-sheen surfaces, but they still show. I keep a small brush and the leftover paint in a jar labeled with the room and date.
Check the wall in morning light, afternoon light, and with the room lamps on; each angle finds different spots the others miss.
Fingerprints at chair rail height and scuffs near the floor are the usual suspects. A quick dab and feather with the brush beats waiting until the whole wall needs repainting.
Cost Considerations
Materials for a small powder room or laundry wall run about $500 if you do the work yourself. That covers boards, adhesive, primer, and paint; tools you borrow or already own.
Labor would triple that figure in most markets, which is why this project lands on so many weekend lists.
MDF runs cheaper than solid pine, and the gap widens fast once you are covering a whole wall. The risk is water damage; a leak behind a washing machine or a steamy bathroom without venting swells MDF at the edges.
I factor in 10% extra for cuts and mistakes, because one happens even when I’m careful.
Design Styles
Vertical shiplap reads farmhouse by default, paired with exposed beams and brick if the house has them. The same boards in black or charcoal shift the mood toward contemporary; the contrast does the work without adding more elements.
English Shaker style uses the same clean lines but keeps everything muted and natural, more quiet than rustic. Cream boards with simple peg rails and no extra molding fit that restraint.
White or cream shiplap can serve modern spaces if you add black elsewhere, in lighting or hardware, to stop the room from going too soft. The boards themselves are neutral; the surrounding choices push them toward one style or another.