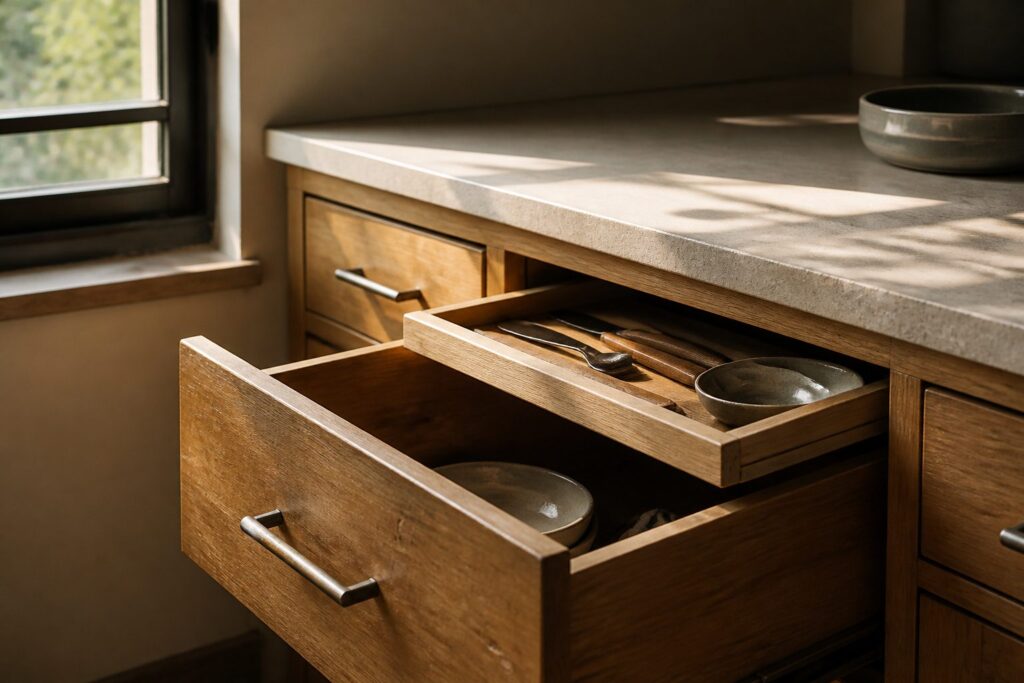
A sliding tray in a drawer is a shallow platform on its own set of slides, mounted above the main compartment so the bottom layer stays reachable.
Fit is the problem: most ready-made kits demand drawer boxes between 8 13/16" and 20 5/16" wide, with depth from 17 5/16" to 22" front to back. Measure the outside dimensions wrong by even 1/16" and the tray binds or lists to one side.
What a Sliding Tray in a Drawer Actually Does
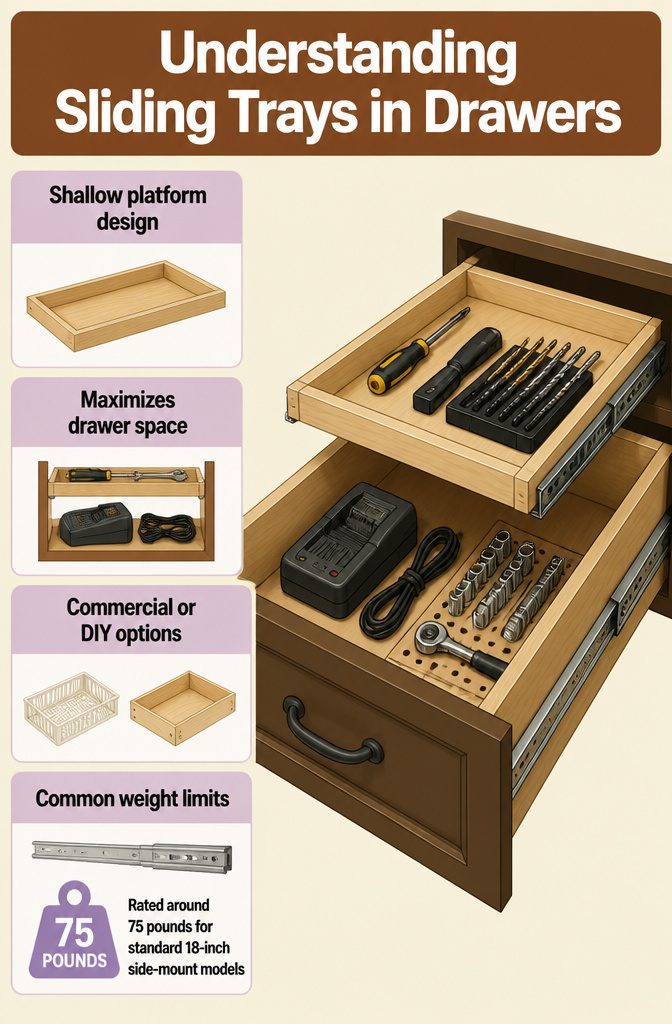
A sliding tray in a drawer is a shallow platform mounted on its own set of drawer slides, sitting above the main compartment so items stored underneath stay reachable.
Drawer space wastes itself vertically: stack two layers of anything and the bottom one becomes archaeology. The tray brings the upper layer forward with a pull, so nothing hides.
I have seen these work two ways. Store-bought inserts drop in with premade dimensions, often plastic or coated wire, ready in about ten minutes.
DIY builds use plywood or thin hardwood on side-mounted slides, and those let you tune the height clearance to whatever sits below, a tray for drill bits riding above a pegboard organizer or a ledge shared between two sliding levels.
The mechanics stay simple either way. The tray’s slides mount to the drawer walls or to a frame; the tray body spans between them.
Full-extension slides are worth the extra inch of depth, since a tray that stops shy of the drawer’s front lip defeats its own purpose.
Load capacity shifts with material, a quarter-inch plywood tray holding less than a half-inch hardwood equivalent, and sliding hardware rated around 75 pounds is common for standard 18-inch side-mount models.
A sliding tray solves the same problem regardless of build path: it claims the dead air above battery chargers, utensil piles, or socket sets without burying what lives beneath them.
Sliding Cutlery Inserts
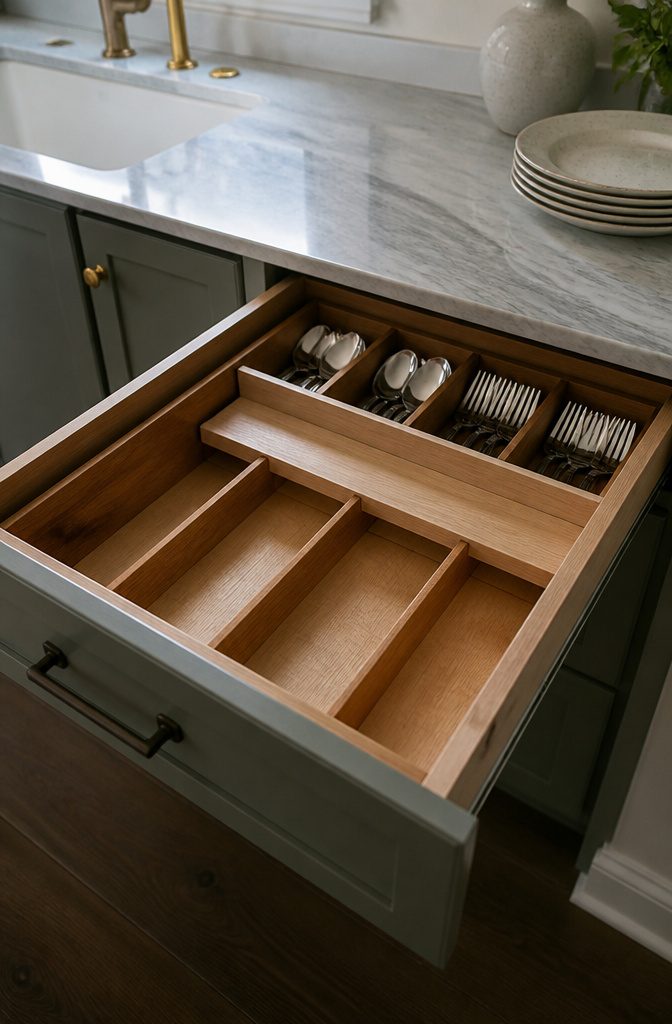
A dedicated cutlery organizer with a sliding divider turns the last six inches of drawer depth from dead space into usable storage.
The divider itself rides on a simple track, so pulling it forward exposes the rear spoons and forks without the old routine of unloading the front row onto the counter.
The build matters if you plan to load it daily.
Outer boxes at this grade use 5/8" thick solid wood sides with a 1/4" plywood bottom; the inner sliding tray matches that 1/4" bottom thickness but scales down to 3/8" solid sides to keep weight reasonable.
Overall height for the sliding divider comes to 1 5/8", including that bottom panel, which leaves enough rail engagement without eating all your vertical clearance.
Drawer boxes run from 8.8125" up to 33.3125" in width, though the maker warns that anything past 24" risks racking and drops warranty coverage.
For a standard kitchen drawer, the starting point is $89.90, which gets you the outer box and the sliding insert; you supply your own slides, so factor that into the total before you measure twice and order once.
DIY Drawer Dividers with Sliding Tray
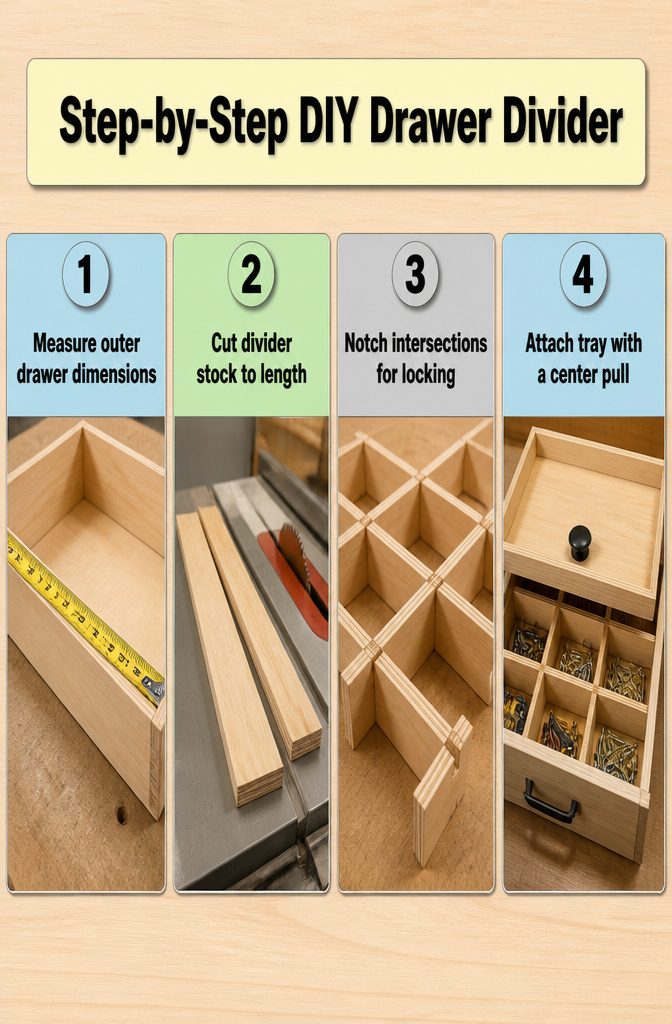
A sliding tray above fixed dividers is the most useful workshop drawer setup I have found, yet it is barely documented compared to store-bought organizers.
The build starts with the drawer box outer dimensions.
Measuring the outside rather than the inside matters because the tray and divider frame both reference that shell. I cut the divider stock to those lengths and notch the intersections so the grid locks together without fasteners.
The tray itself rides on a thin ledge or small hardwood strips glued to the divider tops. A center pull lets the tray slide forward to expose the compartments underneath.
The gap between tray bottom and divider top needs to stay shallow, maybe half an inch or so, or small items will wedge themselves in. I learned that after one tray caught on a driver bit stored too tall.
What makes this approach worth the effort is the two-level access. The top tray holds the dozen bits or fasteners used daily.
Everything else stays sorted below but reachable in one motion. Precise DIY measurements for this specific setup are hard to find in published sources; most tutorials assume you will buy a premade insert.
For a weekend build with scrap plywood and a tablesaw, that gap in the literature is frustrating but also an opening to make something that actually fits your tools.
Multi-Function Drawer Organizers
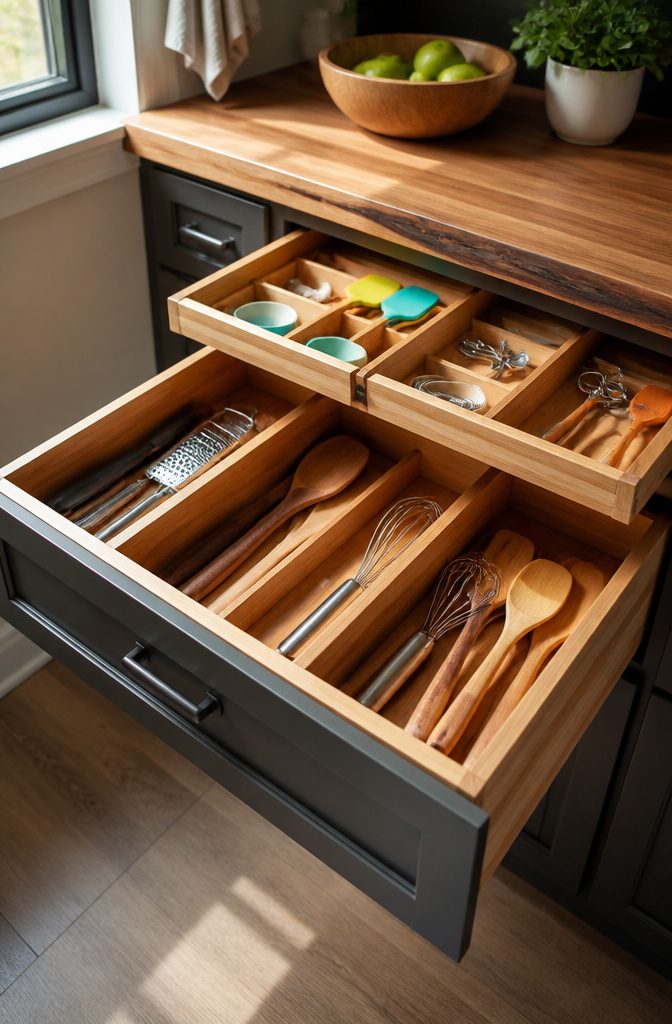
A multi-function drawer organizer with removable compartments turns one empty box into several layouts in the same afternoon.
The bottom level stays fixed, usually split into four different compartments, while the upper trays slide back and forth to expose whichever section you need.
You can also lift the trays out entirely when the item underneath is too large for a partial opening.
This modularity suits drawers that hold mixed categories, not one dedicated purpose. A kitchen junk drawer, a hobby station, or a tool cabinet all collect unlike shapes that would waste space in a purpose-built insert.
The sliding tray in drawer systems lets you sort by size on the bottom and by frequency of use on top, so the thing you grab daily sits under your thumb while the rarely-needed stuff stays accessible but out of the way.
The fit matters more than the brand. Shallow drawers lose the upper tier to height; deep ones swallow the bottom compartments unless you fill them.
I have watched a 2-inch tray slide smoothly on hardwood rails and another identical-looking unit jam on painted MDF because the clearance was too tight. If the drawer sides are not perfectly square, the modular trays rack and stick.
For renters, this is the critical limit: you can swap the organizer into the next apartment only if the new drawer is deeper and wider than the old one, not merely close.
Tiered Drawer Systems
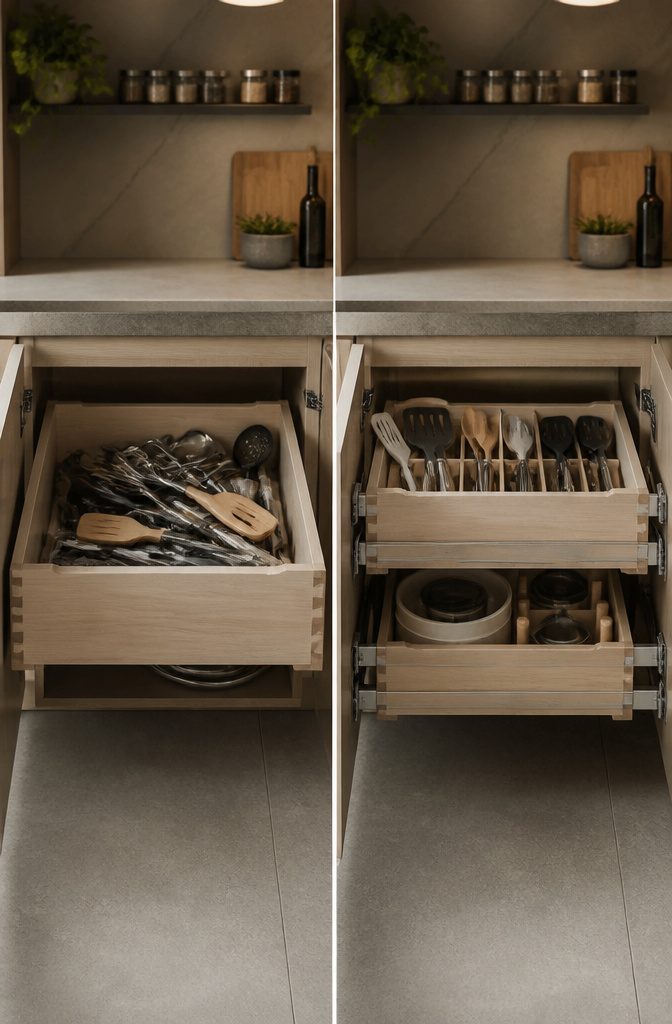
Tiered drawer systems turn one cabinet cavity into two fully functional storage levels, and the sliding mechanism works differently than a single tray riding on the original drawer box.
With these units, the whole assembly replaces your existing drawer, and the top level glides backward into the cabinet on its own dedicated slides to reveal the full depth underneath.
Prices run $282.99 to $646.99, putting them at the upper end of ready-made organizer options.
The built-in second level means nothing gets buried. A cutlery version from Rev-A-Shelf, for instance, parks spatulas and serving spoons at standing height while the lower deck holds lesser-used items flat.
Ball-bearing slides carry the top tier, not the friction-fit runners you see in cheap add-a-tray kits. Some versions come with BLUMOTION soft-close hardware included; others ship without slides so you can match what your cabinet already uses.
The face-frame and frameless mounting brackets differ, and installing the wrong pair leaves the upper tray proud of the opening or binding on the frame.
A deeper variant exists for standard 24 and 30 inch base cabinets, and one line even fits deep drawers at 33 to 36 inches wide.
That width jump matters because the complete replacement box needs exact side clearance; measure the interior cabinet width, not your old drawer front.
Wood Types and Materials
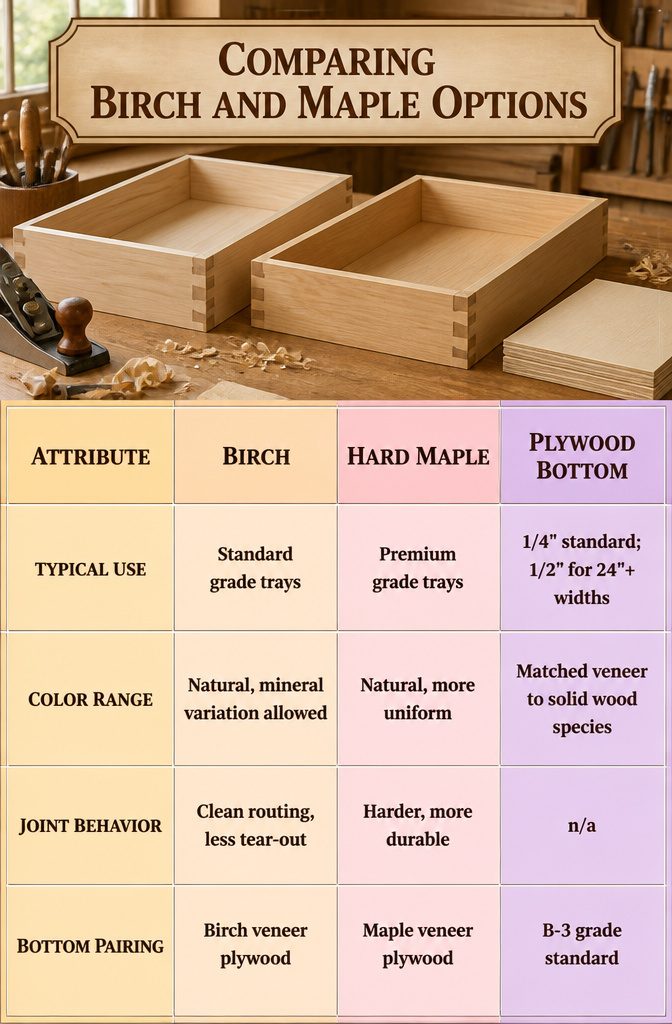
Birch and maple are the two solid woods you will actually find in ready-made sliding trays, and the choice between them matters more than the showroom photos suggest.
Birch runs slightly softer on the Janka scale, which means a routed dovetail bites cleanly without the tear-out that can plague harder species.
Maple demands sharper tooling and a steadier feed rate, but the finished joint survives more abuse. For a tray that slides in and out twice daily, that hardness difference adds up over years.
The bottoms are plywood, not solid stock, because a 1/4" panel riding in a dado groove handles seasonal movement without splitting. A 1/2" bottom is offered as an upgrade for spans of 24" or wider, where the standard 1/4" can sag under load.
The sides sit at 5/8" thick, a dimension that leaves enough meat for a 1/2" dado recess while keeping the overall height reasonable for standard drawer openings.
| Attribute | Birch | Hard Maple | Plywood Bottom |
|---|---|---|---|
| Typical use | Standard grade trays | Premium grade trays | 1/4" standard; 1/2" for 24"+ widths |
| Color range | Natural, mineral variation allowed | Natural, more uniform | Matched veneer to solid wood species |
| Joint behavior | Clean routing, less tear-out | Harder, more durable | n/a |
| Bottom pairing | Birch veneer plywood | Maple veneer plywood | B-3 grade standard |
The eased edges on all sides, that 1/16" softening, keep splinters from catching on hardware or hands. A UV clear coat over either species protects without the plastic look of a film finish.
Installation and Fit
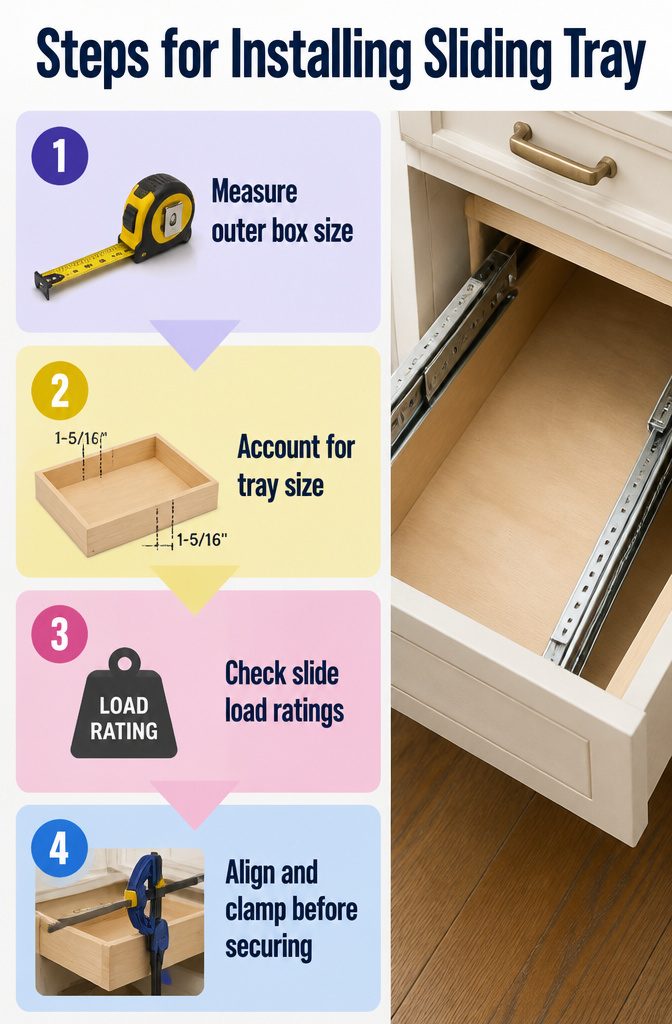
Measuring the outer drawer box wrong is the fastest way to waste a Saturday. The sliding tray will sit 1-5/16" smaller in width and depth than the outer box, so the outside-to-outside dimensions are what matter, not the inside cavity.
I keep a tape measure fixed on 1/16" increments because that is the tolerance these kits demand, especially for depth between 17 5/16" and 22" front to back.
Load rating on the slides is where I have seen people trip up. The tray itself might be 3/8" solid wood sides with a 1/4" plywood bottom, but once you load it with cutlery or tools, the slides carry every pound.
I would not install anything without checking the slide spec against the total weight; a 24" maximum outer box width exists for a reason, and the warranty drops entirely past it.
Alignment mistakes usually show up as binding or a tray that lists to one side.
The manufacturer tolerances differ, so one kit might forgive a 1/16" gap while another demands tighter. My advice is to clamp everything before a single screw goes in, then slide the tray through its full travel.
If it drags on the left at the back, that is the moment to fix it, not after the glue dries.
Keeping Organizers from Shifting
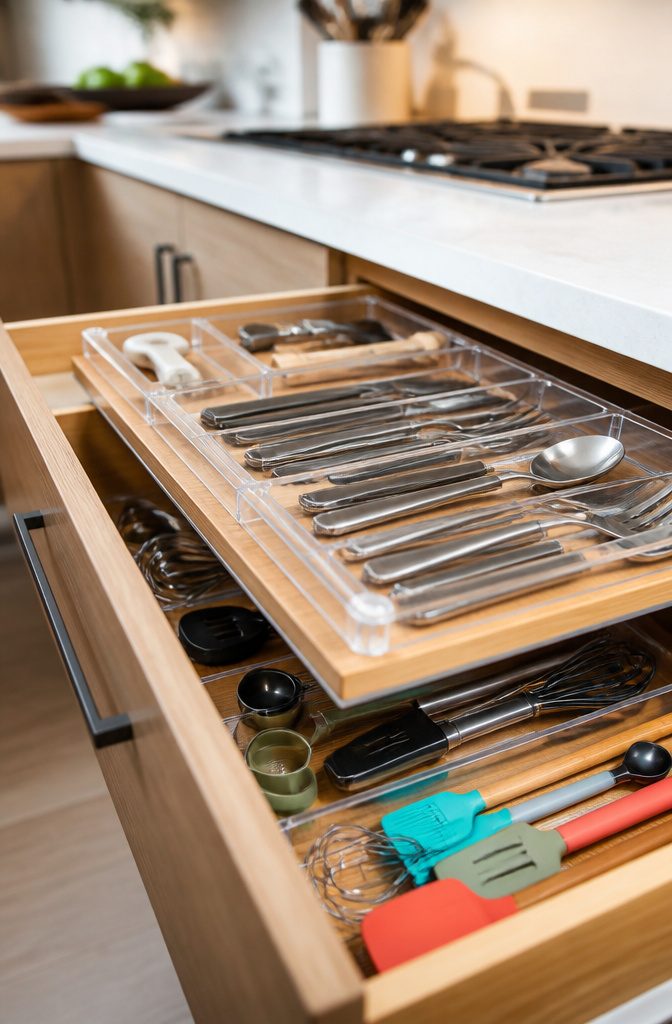
A sliding tray in drawer setup only stays useful if the organizer beneath it quits wandering. Museum Gel handles this without the mess of tape or the bulk of a liner.
The Ready America clear version has a firm, putty-like consistency that is not really sticky but very grippy, which means containers lift out clean when you want to rearrange, yet they hold still through daily opening and closing.
The gel matters most when your drawer and its organizers are not a custom match, which is the usual case with modular bins or a silverware tray that sits a half-inch short on each side.
That gap lets everything drift. A dab of gel at the corners fixes it without committing to a permanent layout.
Integrated slides change the equation. When a sliding tray in drawer runs on its own hardware, the tray itself is captive and the organizer below is usually sized to the cavity, so shifting is not the problem.
Save the gel for retrofit jobs and freestanding pieces where the fit is loose. One jar goes further than you would expect, enough for every drawer in the house if you are sparing with it.
Customization and Sizing
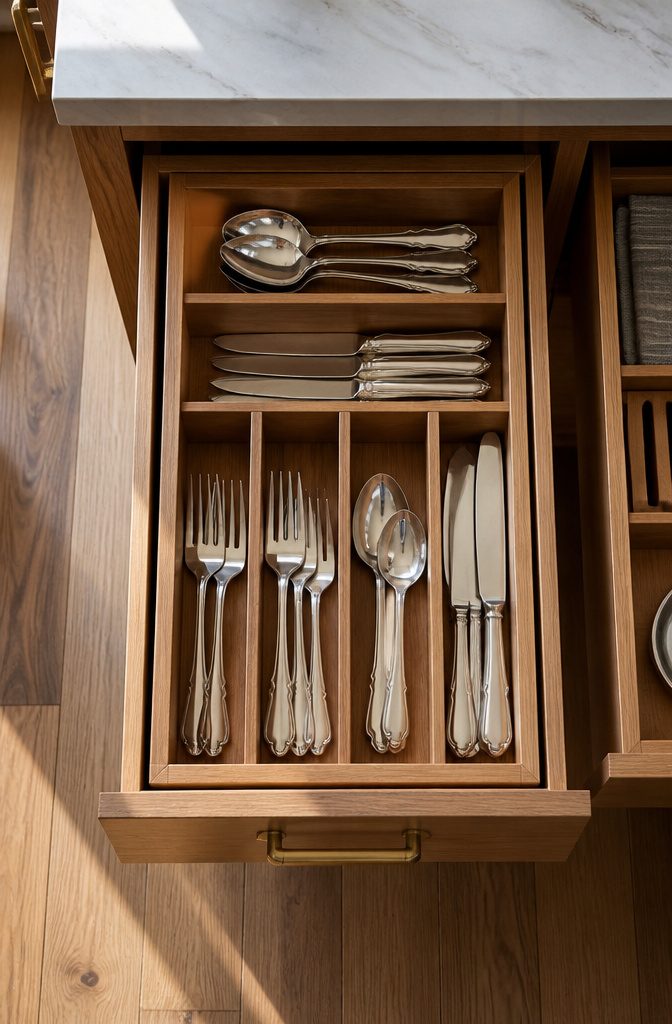
A sliding tray in drawer setup only works if the tray actually fits the box you already have.
Most ready-made kits come in fixed widths ranges, like one design built for drawer boxes between 8 13/16 inches and 14 5/16 inches wide, and another for 11 13/16 inches up to 20 5/16 inches.
Depth runs from 17 5/16 inches to 22 inches front to back. If your existing drawer falls outside those brackets, you are looking at custom work.
The custom route means ordering to your exact outside dimensions, measured in 1/16 inch increments, with a 12 to 13 work day lead time. You pick the cutlery divider layout, A through D, based on how you actually store things.
The inner sliding tray ends up 1 5/16 inches smaller in both width and depth than the outer drawer box, so the math is already done for you. Minimum outer box height is 4 inches, and anything over 24 inches wide loses its warranty.
I tend to think the extra wait pays off only if your drawer is an odd size or you need a specific utensil layout. For standard cabinets, the off-the-shelf options cover most kitchens without the two-week pause.
Frequently Asked Questions
What types of sliding trays are available?
You will find four main kinds: sliding cutlery inserts with forward-pull dividers, DIY drawer dividers with a shop-built tray above fixed compartments, multi-function organizers with removable upper trays, and tiered drawer systems that replace the whole drawer box so the top level glides backward into the cabinet.
Each type serves a different drawer depth, budget range from about $90 up to $650, and frequency of use.
How can I build or install a sliding tray?
Measure the outside of the drawer box, not the inside cavity, because the tray ends up 1-5/16 inches smaller in both width and depth.
For a DIY build, cut divider stock to the outer shell lengths, notch intersections so the grid locks without fasteners, and set the tray on thin ledges glued to the divider tops with a shallow half-inch gap below.
For ready-made kits, clamp everything before driving screws, then run the tray through full travel to catch binding before glue dries.
How do I stop drawer organizers from sliding around?
Putty-like Museum Gel at the corners holds modular bins or silverware trays still through daily opening and closing, yet lifts away clean when you want to rearrange.
It matters most when the organizer is not a custom fit and leaves gaps on the sides. Skip it for integrated slide systems where the tray is captive and the lower organizer is sized to the cavity.
What is the sliding thing on a drawer called?
It is called a drawer slide or drawer glide, the hardware mounted to the sides or bottom of a drawer box that lets it move in and out of the cabinet.
Ball-bearing slides are common for sliding trays, rated around 75 pounds for standard 18-inch side-mount models, and full-extension versions are worth the extra depth so the tray clears the drawer front lip.
How to add sliders to drawers?
Side-mount slides attach to the drawer walls or to a frame built inside the box, with the tray body spanning between them.
Check the slide load rating against total weight including contents, not just the empty tray; a 24-inch maximum outer box width exists because wider spans risk racking and void the warranty.
Clamp and test full travel before final fastening to catch any left-right tilt.
What is a drawer glide?
A drawer glide is the same hardware as a drawer slide, the track and roller or ball-bearing mechanism that carries a drawer or sliding tray in and out.
Standard 18-inch side-mount models often carry about 75 pounds, while tiered systems may use heavier ball-bearing slides with soft-close hardware like BLUMOTION.
What can I use instead of drawer slides?
A DIY sliding tray can ride on thin hardwood strips or a shallow ledge glued to fixed divider tops, letting the tray slide forward without purchased hardware.
That friction-fit approach works for light shop trays but lacks the load capacity and full extension that ball-bearing slides provide; for cutlery or daily-use kitchen trays, proper slides are the better investment.